Introduction — publish more, panic less
Solo creators juggle idea generation, drafting, editing, design, promotion, and the endless admin that comes with running a one-person publishing engine. The outcome: inconsistent publication, missed opportunities, and burnout. This article presents a compact, repeatable content workflow for solo creators that turns scattered tasks into a predictable publishing rhythm. Follow this 5-step process to ship reliably, scale your output without working longer hours, and protect creative energy.
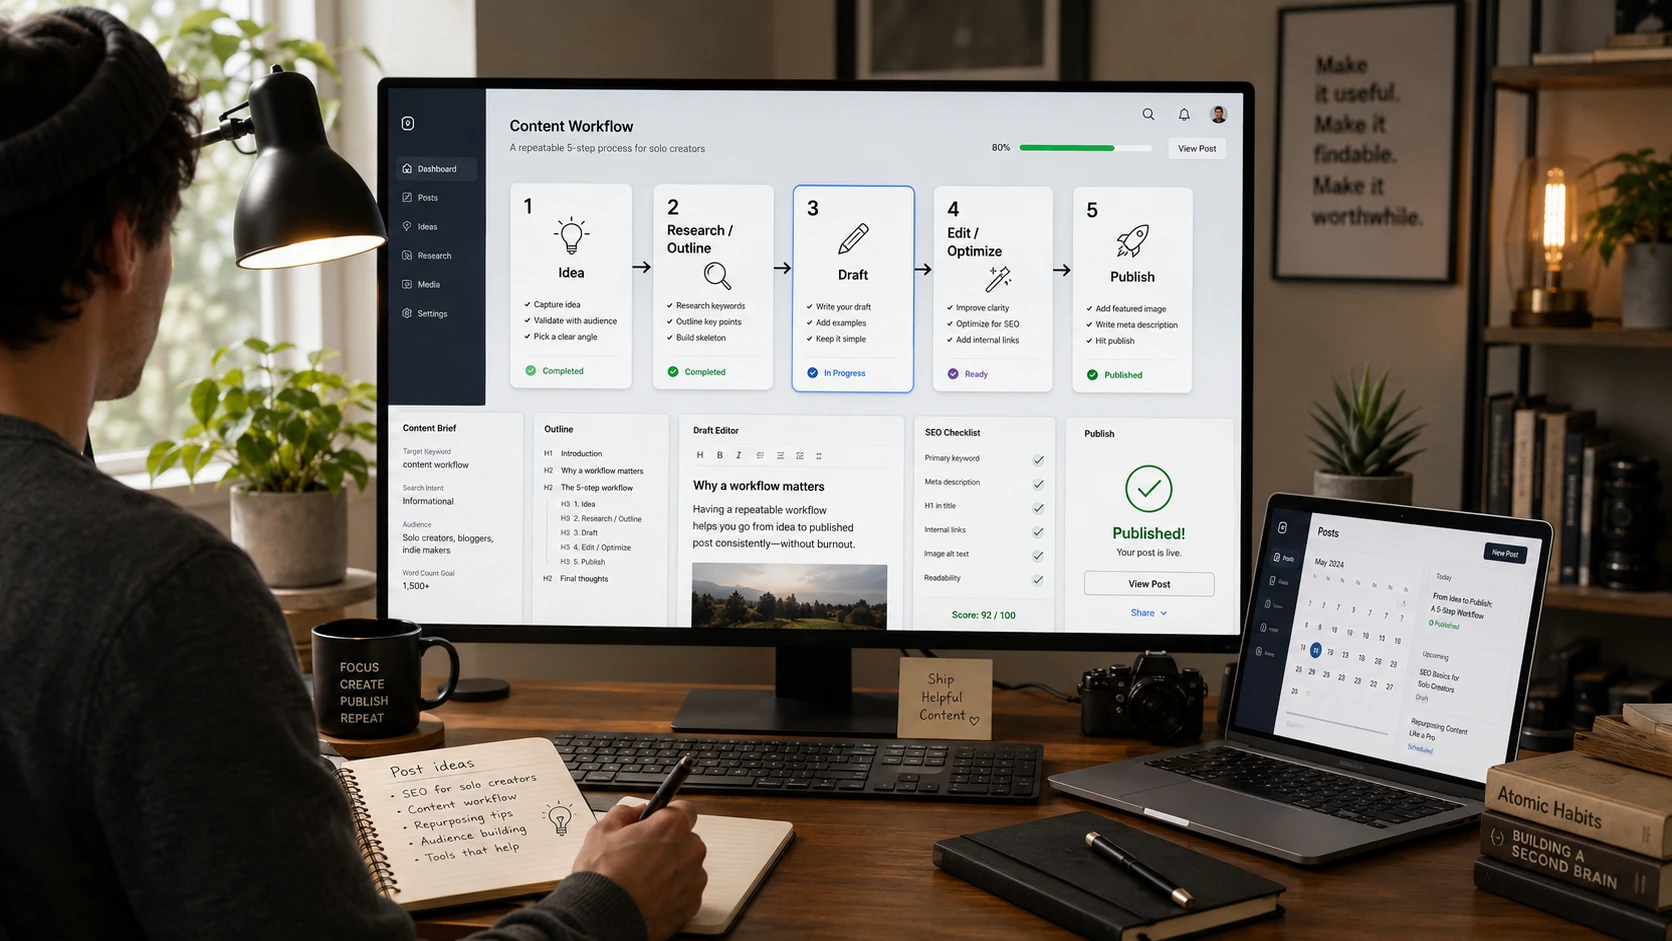
The 5-step repeatable workflow (overview)
Every publishable piece should pass through the same five stages. That repeatability is what turns ad-hoc effort into a system you can trust.
- 1. Capture & validate the idea
- 2. Plan & outline (timeboxed)
- 3. Create — focused drafting
- 4. Polish, assets & final checks (content production checklist)
- 5. Publish, distribute & review
Step 1 — Capture and validate ideas quickly
Keeping a steady stream of ideas is the foundation of any solo creator workflow. Capture everything, then validate before you commit production time.
- Capture: Use one inbox (notebooks, a single note app, or voice memos). Tag ideas by format (short post, long article, video, newsletter) and estimated effort.
- Validate: Do a one-minute validation: is the idea useful to your audience, reusable (can it be split or repurposed), and aligned with current priorities? If unsure, mark it as a candidate and move on.
- Prioritize: Use a simple score: audience impact (1–3), effort (1–3), and timeliness (0–1). Tackle high-impact, low-effort items first.
Step 2 — Plan and outline with timeboxes
A short, targeted plan prevents endless rework. Timeboxing the planning step keeps it lean.
- Timebox: 20–45 minutes. Decide the format, primary message, and 3–5 section headings or beats.
- Output: A one-page outline with title options, key points for each section, and a call to action (CTA).
- Tools: Lightweight templates (outline, headline formulas) and a calendar entry for production blocks.
Example headline formula: [Benefit] + [Who] + [How] — e.g., “Publish Faster: A Timeboxed Content Workflow for Solo Creators”.
Step 3 — Create: timeboxed drafting sessions
Drafting should be deliberate and interruption-free. The magic for solo creators is batching and strict timeboxes.
- Pomodoro-style blocks: 50–90 minutes focused, then a 10–20 minute break. Aim to complete a rough draft in one to two blocks for short pieces, three to four for long-form.
- Draft first, edit later: Separate creation from editing. Ship a rough but coherent draft before polishing.
- Micro-deliverables: If a long project, break it into publishable chunks (part 1, part 2) to avoid perfection paralysis.
Step 4 — Polish, assets, and the content production checklist
This is where a content production checklist reduces friction and prevents last-minute scrambles. Timebox the polish step to avoid over-editing.
- Timebox: 30–90 minutes depending on length and format.
- Essential checklist:Headline tested (2–4 options)
- Intro hooks clearly state the value
- Subheadings show structure and scannability
- Key facts, links, and sources verified
- SEO basics: primary keyword in title and first 100 words, meta description draft
- Images/graphics created or selected, with captions and alt text
- CTA and next-step links added
- Accessibility and formatting checks (lists, short paragraphs)
- Final read aloud or quick peer review if possible
- Use templates: A reusable meta description and social post template saves time on publish day.
Step 5 — Publish, distribute and review
Publishing is wider than hitting “publish.” The distribution and quick review close the loop and feed future ideas.
- Publish: Upload, add tags and categories, schedule or publish immediately. Keep a short publication checklist for platform-specific tasks.
- Distribute: Use scheduled social posts, one newsletter blurb, and one outreach action (e.g., message a collaborator or mention in a community).
- Review: After 7–14 days, look at basic metrics (views, clicks, engagement). Note what worked for the next iteration and add learnings to the idea inbox.
For creators who use lightweight orchestration or tooling in their publish flow, see resources about automated publish orchestration to reduce manual steps: publish.
Practical schedules: two sample timeboxed workflows
Pick a cadence that suits your energy and audience.
- One-hour post (short):10 min — finalize outline
- 40 min — focused draft (50-min block with one short break if needed)
- 10 min — quick polish, headline, and publish
- Two-hour article (long-form):30 min — outline and research
- 60 min — draft (one or two focused blocks)
- 30 min — polish, images, and publish checklist
These are templates — adjust durations to your working style and the expected return of the piece.
Batching, repurposing and avoiding burnout
To keep output high without burning out, batch like tasks and reuse content across channels.
- Batch similar tasks: Draft 3 posts in 2 blocks, then schedule a single polish session for all three.
- Repurpose: Turn a long post into a thread, short video, and newsletter excerpt. This multiplies reach while minimizing extra writing.
- Guardrails: Limit daily production hours, reserve at least one creative-free day per week, and keep a “minimum viable publish” standard to avoid perfectionism.
Consistent publishing wins over occasional perfection. Ship, measure, iterate.
Measure what matters — simple metrics and a review cadence
Keep measurement lightweight: pick 2–3 primary metrics and a monthly review slot.
- Primary metrics: page views, average time on page (engagement), and a conversion or follow action (newsletter signups or social follows).
- Review cadence: brief weekly check for immediate issues, and a monthly retrospective to adjust topics, formats, and time allocation.
- Use learnings to feed new validated ideas into your inbox for the next cycle. If you want a step-by-step technical approach to prioritizing work, see playbook on log-file analysis and prioritization: step.
One-page content production checklist (copyable)
- Idea captured and validated
- Outline completed (20–45m)
- Draft completed in timeboxed blocks
- Polish & checklist: headline, intro, subheads, links, SEO, images, CTA
- Publish: tags, meta, schedule
- Distribute: social, newsletter, outreach
- Review after 7–14 days: record one key learning
Conclusion — make repeatability your superpower
Solo creators don't need to invent a new process every time. Use a compact, timeboxed content workflow for solo creators, standardize the five steps, and embrace repetition. The result is more consistent publishing, clearer priorities, and less exhaustion. Start with one week of disciplined timeboxes and the checklist above — you’ll know fast whether the rhythm works and where to tweak it.
Resources and next steps
- Use the one-page checklist above as a template in your notes app.
- Experiment with batching two weeks per month for creation and one week for promotion and review.
- Track two KPIs and iterate monthly.
Frequently Asked Questions
How long should each step in a solo creator workflow take?
Keep each step timeboxed. Capture and validation: 5–20 minutes. Planning and outlining: 20–45 minutes. Drafting: 50–90 minute blocks (1–4 blocks depending on length). Polishing & assets: 30–90 minutes. Publish & distribute: 15–60 minutes. Adjust based on format and expected return.
What is the minimum viable publish standard for solo creators?
A minimum viable publish includes a clear headline, a strong intro hook, at least three useful points or sections, one image, a simple meta description, and a CTA. It should satisfy the reader’s primary need and be safe to distribute without further edits.
How can I avoid burnout while keeping up a publishing schedule?
Batch similar tasks, repurpose content across channels, limit production hours, keep a ‘minimum viable publish’ bar, and schedule regular rest days. Track energy as well as output; if quality dips, reduce cadence or increase repurposing.
Which metrics should solo creators track?
Start with 2–3 metrics: page views (reach), average time on page or engagement (quality), and a conversion metric (newsletter signups, follows, or leads). Do weekly checks for anomalies and a monthly review to guide topic choices.
Can I automate parts of the publishing process?
Yes. Automate scheduling, social posting, and some image generation. For more advanced orchestration — reducing manual steps in multi-platform publishing — explore lightweight automation or file-based orchestration approaches to handle publish actions reliably.